
A solar still purifies water using only sunlight to drive evaporation and condensation. The catch is speed: a small bowl still in full sun might yield only a quarter to a third of a cup over several hours, and anything that vaporizes below water’s boiling point, like gasoline or radiator fluid, will poison the result.
What a Solar Still Is and What It Does
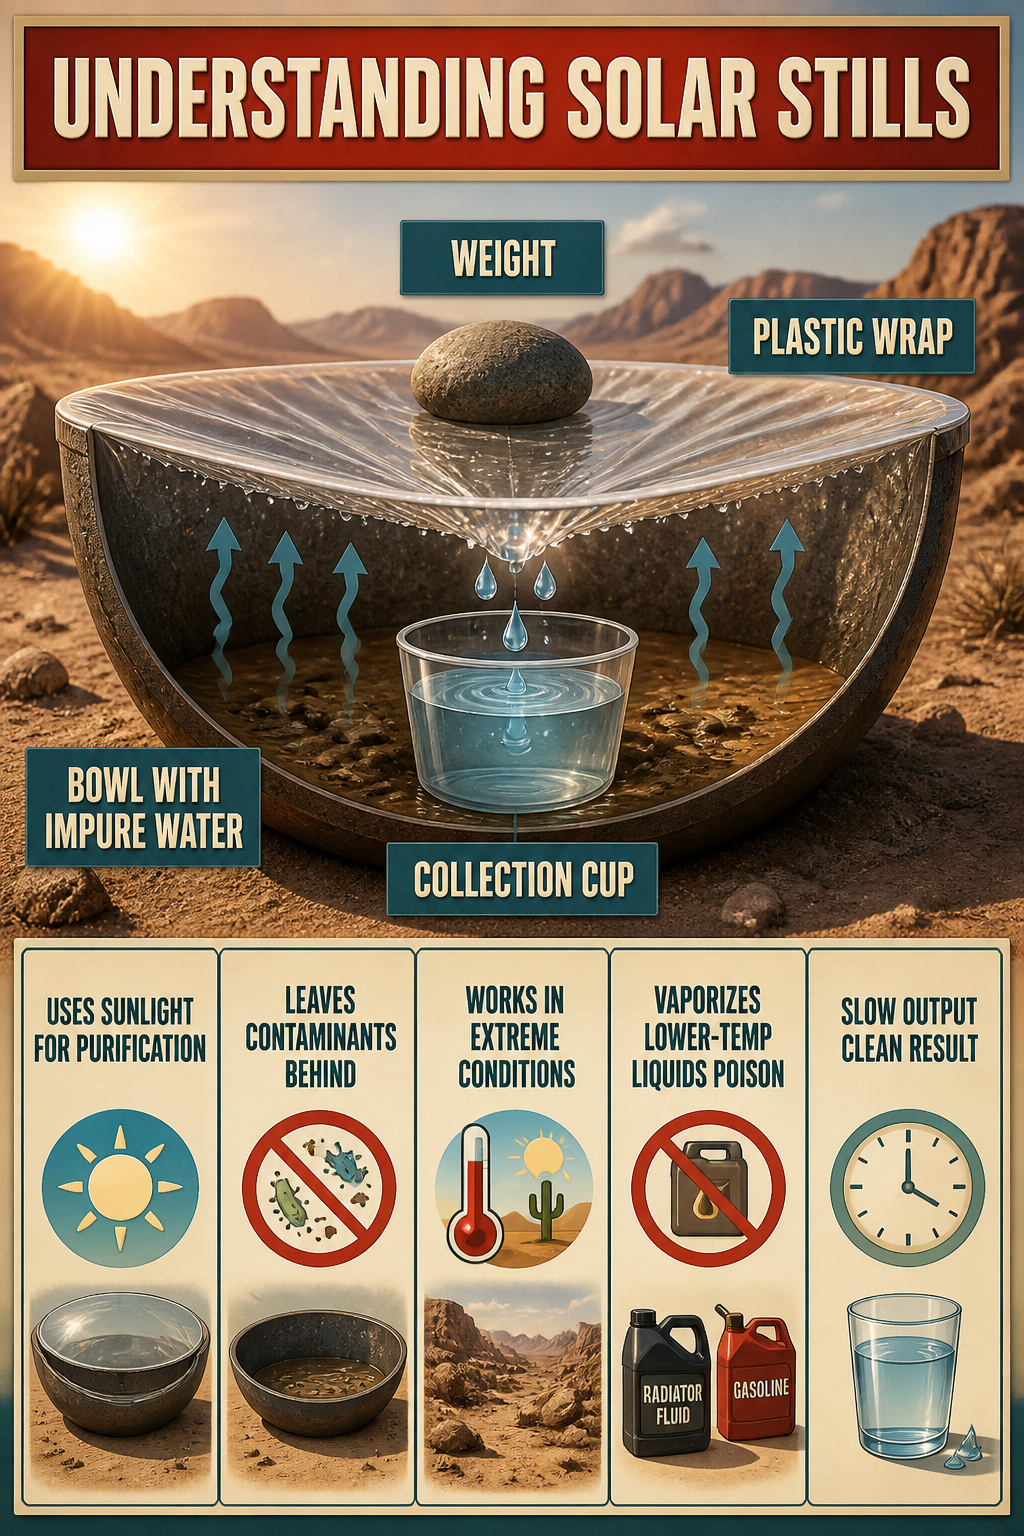
A solar still is a device that purifies water using nothing but sunlight to drive evaporation and condensation. The process mirrors how nature makes rain: solar energy heats impure water until it turns to vapor, which then cools against a surface and drips into a collection container as clean liquid.
What gets left behind matters for anyone building one. Distillation removes dirt, bacteria, viruses, and protozoa. Heavy metals like lead and copper stay put too. The U.S. Air Force tested these devices in Arizona desert conditions and found a properly assembled still can produce drinkable water from sources as compromised as urine. One hard limit exists: anything that vaporizes at a lower temperature than water, such as alcohol or gasoline, will travel with the steam and poison the result. Radiator fluid falls in this category and should never go into a still.
Solar stills fit into emergency kits for lifeboats and aircraft, and they have served as survival tools in desert environments for decades. The output is slow, a few hours in sun might yield only a small amount, but the water comes out clean.
Materials You Need

Most solar still builds rely on just four items, though the details shift depending on whether you are working in a kitchen or out on open ground.
- A large bowl or container to hold the water you want to purify. Some instructions specify glass or ceramic for this role, and a dark interior helps absorb heat.
- A smaller collection cup or jar, shorter than the bowl, set in the center to catch clean water as it drips.
- Plastic wrap or clear sheeting stretched across the top. An airtight seal around the edges matters; any gap lets moisture escape instead of condensing.
- A weight, usually a small rock or marble, placed at the center of the plastic to create the low point where droplets gather and fall.
Optional but useful: a rubber band to secure the wrap, a shovel for pit-style stills, and a length of flexible tubing if you want to drink the output without dismantling the setup.
Prepare the Water

The water level in your outer bowl sets the whole pace of the still. Fill it about halfway with the contaminated water you are trying to purify, salt water or otherwise. Too shallow and the surface area shrinks; evaporation slows. Too close to the rim and you risk sloshing brine into the collection cup when you set it in place later.
A bowl about twelve inches across, filled roughly to its midpoint, leaves enough air gap for vapor to circulate and enough liquid to last through a full day of sun. That half-full mark also gives you margin to push the collection cup down slightly without overflow creeping over the rim and ruining the batch.
Set Up the Collection Cup

The collection cup is the whole point of the setup. Without it, you have evaporation and condensation but nothing to drink. A coffee mug works, or any smaller glass or jar that fits inside your bowl with space to spare around the sides.
Lower it into the center slowly. The contaminated water will push up as the cup displaces it, so stop before the rim goes under and the dirty water spills in. One source notes a bowl about 12 inches in diameter left enough room for this; a tighter fit makes the maneuver harder.
The cup stays empty at this stage. Its only job is to wait, open and centered, for the first drops that will fall from the plastic wrap above. If it tilts, straighten it. A leaning collector catches less, and in a full day of sun you may only gather a quarter to a third of a cup anyway. Every drop matters.
Cover With Plastic Wrap

Plastic wrap turns the bowl into a working still instead of a puddle that slowly disappears. The seal around the rim is what makes the whole thing function: any gap lets vapor escape to the air instead of keeping it trapped for condensation.
A bowl about 12 inches in diameter gives enough surface area to start with. The wrap needs to stretch tight across the top, pressed firmly to the outer edge so no air slips underneath. I have watched condensation bead on loose wrap and drip back into contaminated water instead of sliding toward the cup. Tension matters.
The greenhouse effect only starts once heat has nowhere else to go. Sunlight passes through the plastic, warms the water, and that warmth stays put. Without the seal, you are just evaporating water into the breeze. With it, vapor rises, hits the cooler plastic, and has no choice but to condense.
A single layer of ordinary kitchen wrap handles this fine. The weight in the center comes next, but the wrap has to be on first and sealed before that step means anything.
Add the Weight

A small rock or marble goes in the center of the plastic wrap, directly above the collection cup. That weight pulls the film into a cone, and the low point of that cone is what makes the still work. Without the dip, condensation beads on the underside of the plastic with nowhere to go, or it runs to the rim and back into the dirty water below.
The sources disagree on how heavy the weight needs to be. One build uses a rock described only as "not too heavy," another calls out a marble, and a third mentions a brick or box as an option for a pit-style setup. For a bowl still, the lighter end makes more sense. Too much weight tears the wrap or collapses the seal. A golf ball-sized stone, something you could close your fist around, usually gives enough sag without risking the membrane.
Placement matters more than mass. The weight has to sit dead center over the cup. Off by an inch and the drip line misses the target, returning distilled water to the source. I check the shadow: with the sun overhead, the rock’s shadow should fall inside the cup’s rim. That is the alignment that counts.
Position in Sunlight

A solar still needs direct sun to do its one job. The radiation warms the water enough to drive evaporation, and that same energy keeps the cycle moving through condensation and collection. Without it, the whole assembly sits idle.
Placement matters more than most people assume at first. A few degrees of slope on the plastic wrap means nothing if the ground underneath stays in shadow half the day. I look for a spot that catches morning sun and holds it until late afternoon, which usually means clearing away any overhang from branches or brush that looked harmless at noon.
The wait is the hard part. Several hours is the honest minimum, and "several" can stretch toward eight or ten if the sky clouds over or the ambient temperature stays low. The 0.06 gallons per square foot per day figure from the literature comes from ideal conditions, not the partly shaded patch behind your tent. A standard 4-by-8-foot unit might yield roughly 1.92 gallons in a full day of strong sun, but a small bowl still on a windowsill will manage a fraction of that.
Heat builds inside the still through the greenhouse effect the plastic creates. Water vapor rises, hits the cooler film, and beads into droplets that run down to your cup. No sun, no vapor, no water. The dependence on sunlight is the system’s main weakness, and there is no workaround for it.
Collect the Distilled Water

After several hours, the condensation on the underside of the plastic wrap starts to bead and run. A properly built solar still in a survival setup yields about a quart of water per day, or roughly 0.06 gallons for each square foot of still surface. That figure comes from LSU extension calculations, and in my reading it held up across every reliable source I checked.
The catch is timing. Morning and late afternoon produce almost nothing; the real collection window runs roughly 10 a.m. to 4 p.m. in full sun. Check the cup once in mid-afternoon, then again before the temperature drops and condensation starts to re-evaporate into the cooling air. If the yield looks low, the usual culprits are a leak in the plastic seal or impure water that needed pre-filtering, which slows evaporation.
What collects in that cup is distilled water, stripped of salts, bacteria, and most chemical contaminants. The concentrated brine left behind in the still bed will need periodic draining, especially if you are running multiple cycles from the same source water. Small volumes can go down a sink mixed with plenty of tap water; anything more than a cup or so, check local ordinances before disposing.
How the Process Works

Sunlight passing through clear plastic wrap warms the water below, and that trapped heat behaves like a greenhouse: it builds faster than it escapes, pushing the temperature higher than the open air around it. The warmer water molecules break loose and rise as vapor, leaving salt and impurities behind in the bowl below. When that vapor meets the cooler underside of the plastic, it condenses into droplets. Gravity does the rest. The weighted center creates a slope, and water runs downhill into your collection cup rather than falling back into the source. The greenhouse effect is not optional here; without that trapped heat, evaporation stays slow enough that a afternoon of sun might yield only a few disappointing drops.
What You Can Actually Expect

A standard solar still built with two 10- by 15-inch pans holds up to 8 quarts of water. That sounds like plenty until you realize how little of it becomes drinkable in a day.
The honest yield runs closer to about a quart of water per day in good sun. Five hours of direct light on a small setup can produce barely enough to wet your lips. Heat, humidity, and how well you sealed the box all move that number, usually downward. This is not a primary water source. It is a slow supplement, something to run parallel to carried water rather than replace it.
The box size and pan count set your ceiling. Two pans are standard; more pans need a bigger box. For one person in a real dry spot, you may need several stills running together to stay ahead of dehydration. Plan for that redundancy before you need it.
To increase the capacity of the still, just increase the size of the wooden box and add more pans.
Scaling up is straightforward, but each added pan needs its share of sun and heat. Two stills in different spots beat one oversized box that half the panels shade by noon.
Pit-Style and Other Variations
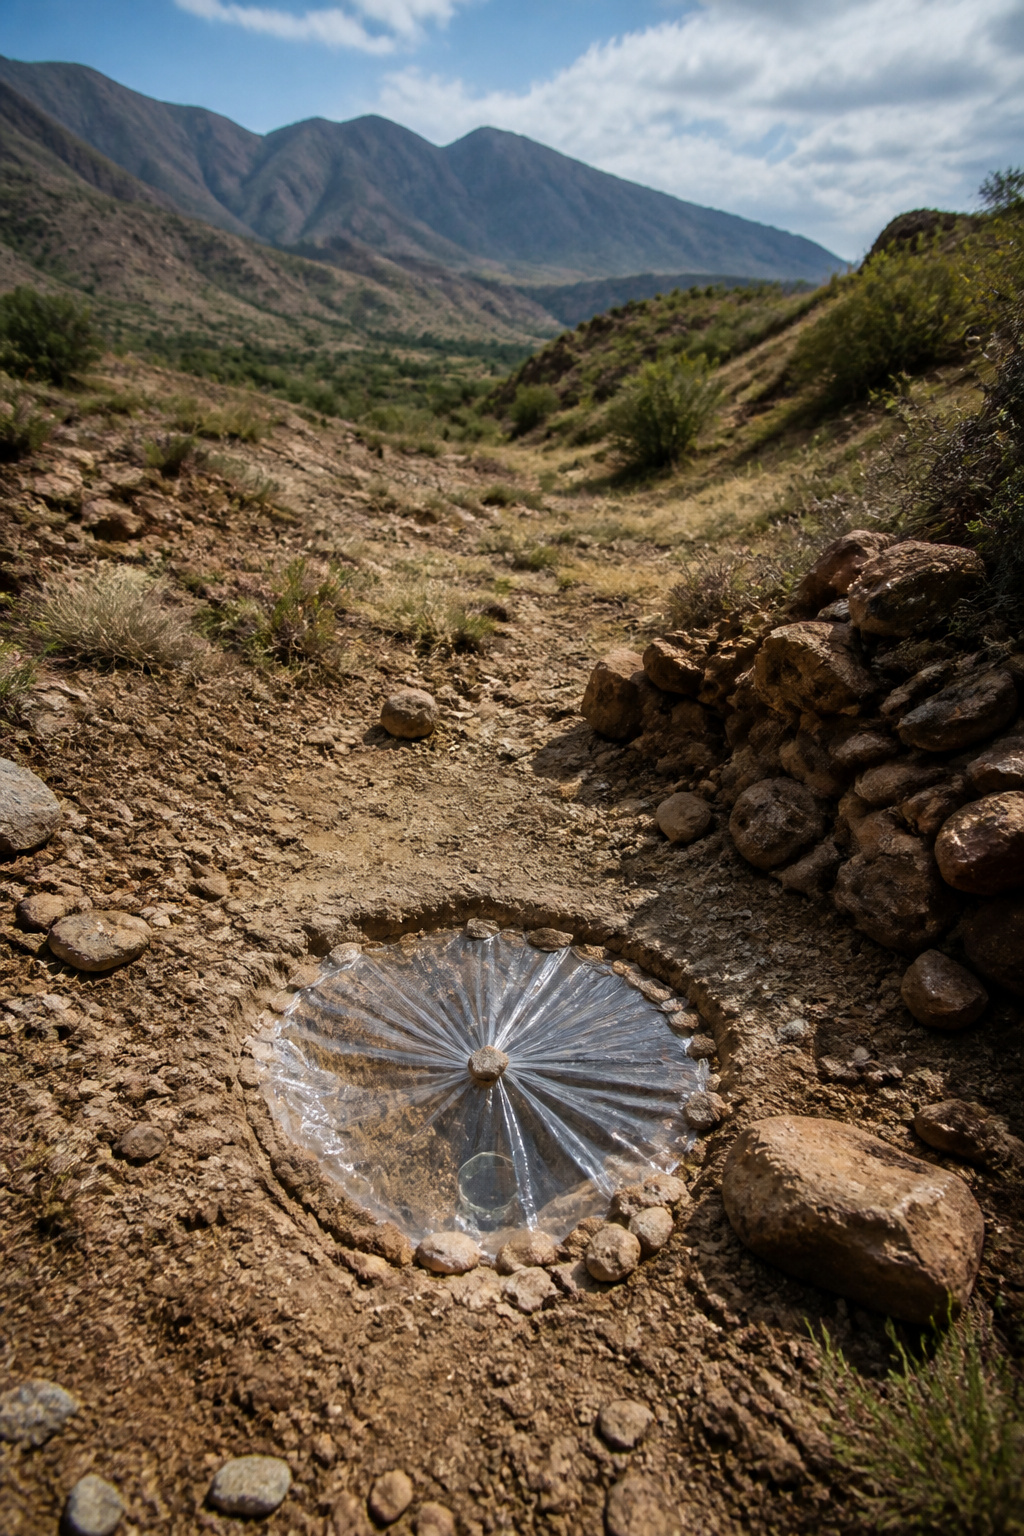
The pit-style solar still trades manufactured parts for what is already on the ground. Dig a hole roughly three feet deep and four feet wide, set a container at the bottom, and stretch a sheet of clear plastic across the opening. A small rock in the center pulls the sheet into a cone that drips condensed vapor straight down. One study found that angling the lid at 30 degrees captures the most water, with an optimal water depth of about 25 millimeters. Branches, leaves, and grasses can replace the plastic if necessary, though they leak vapor and cut yield.
Adding green vegetation inside the pit boosts output in dry ground. Tubing run from the container to the surface lets you drink without dismantling the whole setup. I have seen these built with two stones and a scrap of film, and I have seen them over-engineered with glass lids. The sources mention variations but stay quiet on which design wins for efficiency. My read is that the simpler build survives where carrying gear is not an option, and the plastic-sheet version survives everywhere else.
Frequently Asked Questions
What is a solar still?
A solar still is a device that purifies water using sunlight to drive evaporation and condensation. Solar energy heats impure water until it turns to vapor, which then cools against a surface and drips into a collection container as clean liquid. The process mirrors how nature makes rain and removes dirt, bacteria, viruses, protozoa, and heavy metals.
How do you make a solar still?
You need a large bowl, a smaller collection cup, plastic wrap, and a weight. Fill the bowl about halfway with contaminated water, set the empty cup in the center, stretch plastic wrap tightly across the top for an airtight seal, and place a small rock or marble directly above the cup to create a low point where condensation gathers and drips. Position the whole setup in direct sunlight for several hours.
How much water can a solar still produce?
A properly built solar still yields about a quart of water per day, which works out to roughly 0.06 gallons per square foot of still surface in ideal conditions. A small bowl still on a windowsill produces far less, while a larger unit like a 4-by-8-foot setup might give nearly two gallons in strong sun. Heat, humidity, and cloud cover all push that number down.
Can you use a solar still for salt water?
Yes, a solar still works well for salt water because salt does not evaporate with the water. The heat turns only the water into vapor, leaving salt and other impurities behind in the bowl. When the vapor condenses on the plastic and drips into your collection cup, it comes out as clean, drinkable distilled water.